Migrating away from AMG (AWS-Google-Azure) hosting, A preview into Kubernetes and it's benefits
Operations is a big cost to enterprizes & startups
K8 services by Polydelic, saving costs for enterprise and startup
In 2023 we managed to save our clients more than 60% on their hosting fees by porting them off traditional FANG company cloud accounts to multi-cloud portable solutions. Not only can we achieve higher SLA with node-pool redundancy but we can do this at a fraction of the cost.
Our main push for this was the high maintenance fees Google introduced across it's cloud services.
The benefits of Kubernetes to businesses is vast. Instead of vendor lock you with a typical AMG cloud provider such as Google, Azure or AWS; you now have a solution that can easily deploy and scale with any warehouse or solution you choose. It also gives you a lot more flexibility allowing you to deploy anything you want; we found that some FANG companies had some hard limitations that required messy and complex solutions, for example the pub/sub solution via Google Cloud isn't great.
Below is a preview for all those tech/business founders on how to easily setup a k8 solutions. The full guide would be 20ish pages 🙈. I created this to help people grasp the fundamentals of Kubernetes.
If you're not a developer, the below won't be so useful for you. Contact us if you want us to perform a hosting costs evaluation for your business.
Understanding K8 / Kubernetes
First things first, for the purposes of this tutorial we'll setup a basic ping/pong node api from scratch.
If you don't already have Docker, install it and activate Kubernetes. Kubernetes uses Docker images as a baseline in it's deployments. You can scale, and deploy docker image easily with it.
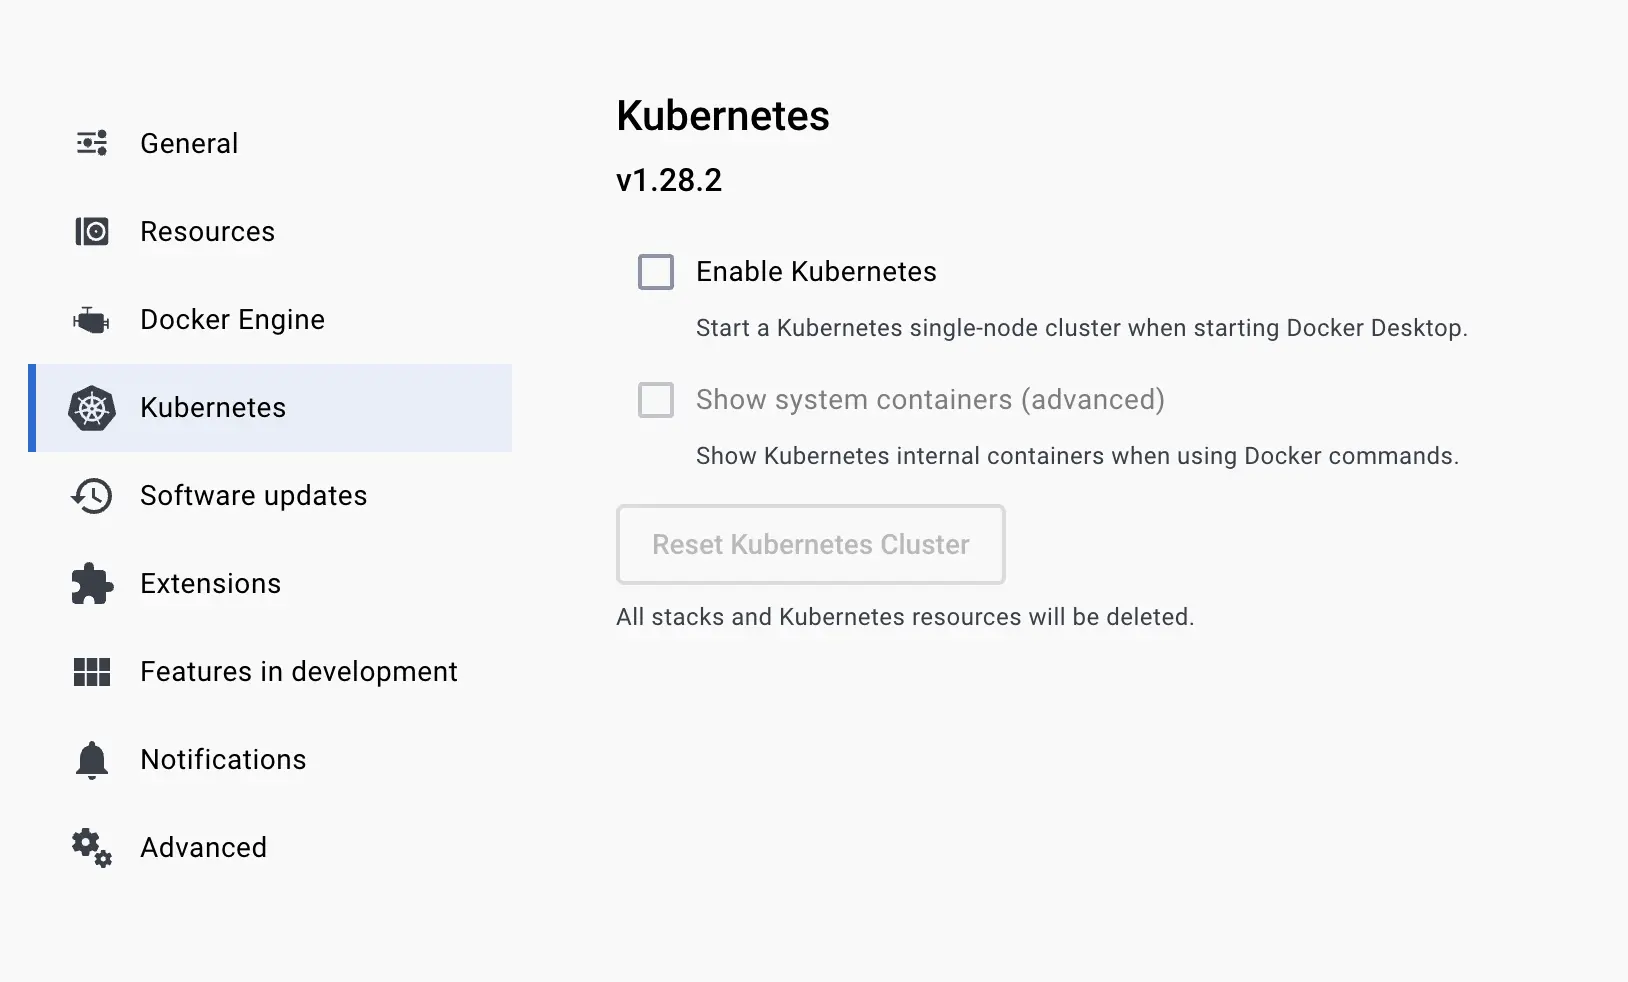
Make sure Docker is enabled
The next step is to install Minikube. What is Minikube? Minikube allows you to interface via the command line with the local Kubernetes cluster.
curl -LO https://storage.googleapis.com/minikube/releases/latest/minikube-darwin-amd64 sudo
		install minikube-darwin-amd64 /usr/local/bin/minikube
Then
minikube start Check that it's working
kubectl get po -A The usual way to interface with a K8 (Kubernetes) control plane is with "kubectl". For testing our API we're going to use a simple ping pong service. https://hub.docker.com/r/norlanliu/pingpong For a Kubernetes API there are a few different layers to consider.
Ingress Layer
When a domain hits your cluster, the ingress decides which service to send the data too. Ingress can come with lots of nice settings, like sticky affinity, redirects and much more.
Service Layer
The service layer is the layer that decides which pods to send the data too. A pod is a container that is running a docker image. A pod can have multiple containers, but for the purposes of this tutorial we'll just use one.
Deployment Layer
Deployment layer maintains, scales and boots images/pods based on a wide range of configurations.
Let's start with the ingress layer. The ingress external layer is usually setup via the hosting provider. They allow you to setup network pointers and adaptors to tunnel traffic based off IP. You usually select a static IP address for domain providers.
Inside Kubernetes we setup an ingress script like so
		// ingress.k8.yaml
		apiVersion: networking.k8s.io/v1
		kind: Ingress
		metadata:
		name: web-ingress-1
		namespace: my-app
		annotations:
			nginx.ingress.kubernetes.io/rewrite-target: /
		spec:
		ingressClassName: nginx
		rules:
			- host: my-domain.app
			http:
				paths:
				- pathType: Prefix
					path: '/'
					backend:
					service:
						name: web-service
						port:
						number: 80
kubectl apply -f ./ingress.k8.yaml The service layer
		// service.k8.yaml
		apiVersion: v1
		kind: Service
		metadata:
		name: node-api-service

		spec:
		type: ClusterIP
		selector:
			app: node-api-deployment
		sessionAffinity: ClientIP
		sessionAffinityConfig:
			clientIP:
			timeoutSeconds: 10800
		ports:
			- name: https
			port: 443
			targetPort: 8080
			- name: http
			port: 80
			targetPort: 8080
We can apply this like so in the command line
kubectl apply -f ./service.k8.yaml As you can see the service layer is pointing the 'service' to the correct destination via name based deployment, ports and much more.
The deployment layer
This is where the true heavy in Kubernetes happens, the other layers before were fairly light.
		// kubectl apply -f deployment.k8.yaml
		apiVersion: apps/v1
		kind: Deployment
		metadata:
		name: node-api-deployment
		spec:
		# How many replicas of this deployment do you want?
		replicas: 1
		selector:
			matchLabels:
			app: node-api-deployment
		template:
			metadata:
			labels:
				app: node-api-deployment
			spec:
			serviceAccountName: default
			containers:
				- name: nine-pm-api
				# The ping pong docker image
				image: https://hub.docker.com/r/norlanliu/pingpong
				ports:
					- containerPort: 8080
				env:
					- name: PROJECT_ID
					# We can add environmental vars if we wish.
					valueFrom:
						secretKeyRef:
						name: project-id
		---
		# How will we scale our service, this is probably the most useful thing about Kubernetes, worry free scaling.
		apiVersion: autoscaling/v2
		kind: HorizontalPodAutoscaler
		metadata:
		name: node-api-deployment-hpa
		spec:
		scaleTargetRef:
			apiVersion: apps/v1
			kind: Deployment
			name: node-api-deployment
		minReplicas: 1
		maxReplicas: 10
		metrics:
			- type: Resource
			resource:
				name: cpu
				target:
				type: Utilization
				averageUtilization: 80
			- type: Resource
			resource:
				name: memory
				target:
				type: Utilization
				averageUtilization: 80
Same as before, but with a different file
kubectl apply -f ./deployment.k8.yaml Now you should be able to ping the API
curl http://localhost:8080/pong/5 This is only a small preview of deploying a K8 service. The full guide would be long. I hope this helps in understanding K8 a little bit more.
Contact us if you want us to perform a hosting costs evaluation for your business.
Call us
Click to call us directly